I finally got my home network in a place where I am happy with it. I wanted to
share my setup and what I learned about it. There has never been a better time
to set up a great home network; there are several new tools that have made this
easier and better than in the past. Hopefully this will help you set up your
home network!
My house
My house is two stories on a standard 25 x 100 square foot San Francisco lot.
The ground floor looks roughly like this:
 --------------------------------------
|               |                      |
|               |         |   Office   |
|    Garage     | Mudroom |            |
|               |         |-------------
|                           | | | | | |
 ---------------------------------------
Upstairs looks like this:
 --------------------------------------
|    ___________                       |
|               |        Living Room   |
|    Bedroom    | Kitchen              |
|               |         -------------
|               |           | | | | | |
 ---------------------------------------
We have a Roku in the living room. My goals for home internet were:
- Good wireless connection in every room
- Ethernet connections in the office
- Ethernet connection to the Roku
- Synology network attached storage (NAS) and other external hard drives reachable from anywhere in
the house
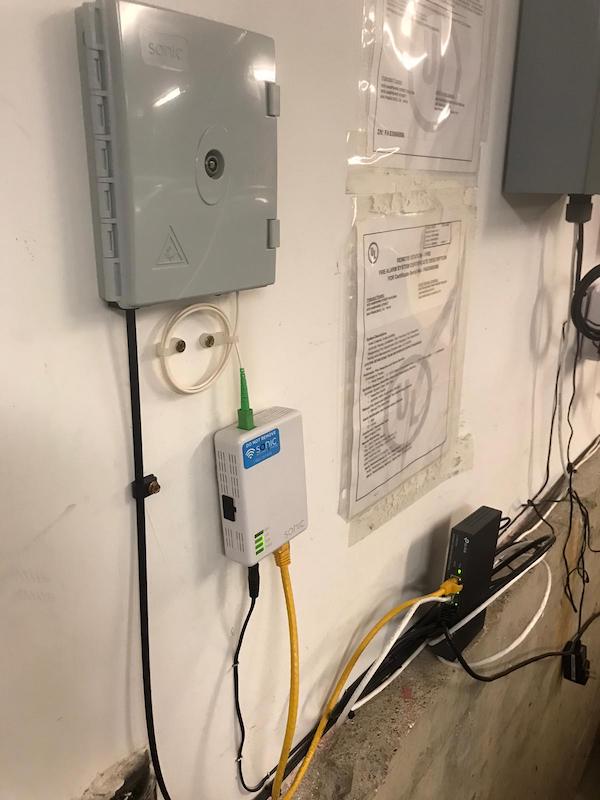
We are lucky to have Sonic Fiber internet service. Sonic comes
in to a box in the garage, and an Ethernet line runs from there to the mudroom.
None of the other rooms have Ethernet connections.
Initial setup
Sonic really wants to push Eero routers to everyone.1 Eero is fairly easy to set up, and Sonic collects a small
fee from renting the router to you. You can extend your home network by adding
more Eero's into a mesh network.
If you have a small apartment, an Eero is probably going to be a good fit.
However, the mesh network was not great for achieving any of the goals I had in
mind. The repeaters (Eero beacon) do not have any Ethernet out ports. It was
difficult to extend the network from the mudroom to the bedroom without renting
two extenders, which added about $100 per year, increased latency and lowered
speeds. Further, clients on the network kept connecting to an Eero that was
further away, instead of the closest one.
Powerline
(NB: please don't stop reading here as I don't recommend this.) My next step was
to replace the Eero's with a traditional Netgear wireless router in the mudroom.
This also could not reach to the bedroom. So I bought a powerline adapter and
plugged one end in near the router and the other end in the bedroom.
Powerline adapters send signal via electric current in your house. They don't
offer great speeds. Devices on your network that use a lot of electricity, like
laundry machines or the microwave, can render the powerline connection unusable.
There are probably better solutions for you than powerline adapters in 2020.
Extending Ethernet to more rooms
I called a cabling company about the possibility of running Ethernet to more
rooms in the house. We decided the bedroom would be very easy since it's
directly above the garage. It took a team of two two hours to drill a hole in
the garage, run a cable up the side of the house to the bedroom, and install an
Ethernet port in the bedroom. This cost about $200.
We looked at running Ethernet to other rooms but the geography of the stairs
made this really tricky.
Side note: future proofing cabling
Our house has coax cables - the traditional method of getting e.g. cable TV
service - running from the garage to four rooms in the house, but it doesn't
have Ethernet set up. This is disappointing since it was built within the last
decade.
There are two things you can do to future proof cable runs in your house, and
ensure that cables can be replaced/swapped out if mice eat them or whatever. I
highly recommend you implement them any time you are running cable. One is to
leave a pull cable in the wall next to whatever cable you are
installing. If you need to run a new cable, you can attach it to the pull cable,
and then pull it all the way through from one end to the other.
Normally cables will be stapled to the wall interior, which makes them
impossible to pull through. The other option is to leave cables unstapled. This
will let you use the coax/other cable directly as the pull cable. In general
though it's better to just leave a second pull line in the wall behind the
port.
Without either of these solutions in place, running new cables is going to be
messy. You can either try to hide it by running it along the exterior walls or
ceiling of your house, or drill holes in the wall every few feet, pass a new
cable through, and then patch up the holes.
Side note: cat 5 vs. cat 6
Your internet speed will be bottlenecked by the slowest link in the network. Be
careful it isn't your cables!
There are two flavors of Ethernet cable. Category 5 is cheaper, but can only
support speeds of 100 Mbps. Category 6 is slightly more expensive but you will
need it to get full gigabit speeds.
The Ethernet cables that come with the products you buy may be Cat 5 or 6. Be
careful to check which one you are using (it should be written in small print on
the outside of the cable).
DHCP
To load google.com, your computer looks up the IP address for Google and sends
packets to it. So far so good, but how does Google send packets back? Each
client on the network needs a unique local IP address. The router will translate
between an open port to Google, say, port 44982, and a local IP address, say,
192.168.0.125, and send packets it receives from the broader Internet on port
44982 to the client with that IP address.
What happens if two clients on your network try to claim the same local IP
address? That would be bad. Generally you set up a DHCP server to figure this
out. When your phone connects to a wifi network it sends out a packet that says
basically "I need an IP address." If a DHCP server is listening anywhere on the
network it will find an empty IP address slot and send it back to the phone.2 The phone can then use that IP address.
Generally speaking, a consumer wireless router has three components:
- wireless radios, that broadcast a network SSID and send packets to and from
wireless clients.
- an Ethernet switch that can split an incoming Internet connection into four
or more out ports. Generally this has one WAN port (that connects to your
modem/ISP) and four LAN ports (that connect to local devices on your network)
- a DHCP server.
You can buy products that offer each of these independently - a four way switch
without a radio or DHCP server will cost you about $15. But this is a
convenient bundle for home networks.
If your network contains multiple switches or multiple routers you need to think
about which of these devices will be giving out DHCP.
Two Routers, Too Furious
At this point my network had one router in the bedroom and one router upstairs
in the living room, via an ungainly cable up the stairs. So I had good coverage
in every room, and the Roku hooked up via Ethernet to the living room router,
but this setup still had a few problems. I didn't have the office wired up, and
the NAS only worked when you were connected to the living room router.
Furthermore, I kept running into issues where I would walk from the living room
to the bedroom or vice versa but my phone/laptop would stay connected to the
router in the room I was just in. Because that router was outside its normal
"range", I would get more latency and dropped packets than usual, which was
frustrating.
How to diagnose and measure this problem
On your laptop, hold down Option when you click the wifi button, and you'll get
an extended menu that looks like this.
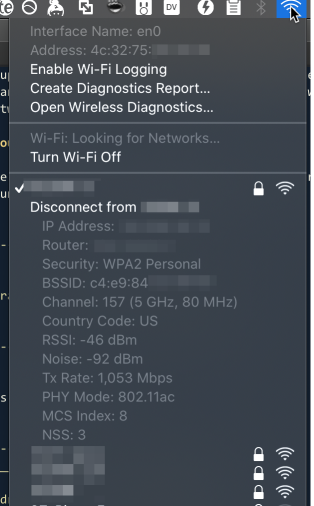
The key value there is the RSSI parameter, which measures the signal quality
from your client to the router. This is currently at -46, a quite good value.
Lower than -65 and your connection quality will start to get dicey - you will
see lower bandwidth and higher latency and dropped packets.
Apple devices will hang on to the router they are currently connected to until
the RSSI gets to -75 or worse, which is a very low value. This is explained
in gory detail on this page. Because router coverage areas are supposed
to overlap a little bit, this means the connection will have to get very bad
before your phone or laptop will start looking for a new radio.
Adjust the power
Generally this means that you don't want the coverage area for the router to
reach to the center of the coverage area for the other router, if you can help
it. If the coverage areas don't overlap that much, clients will roam to the
closest router, which will improve the connection.
You can adjust the coverage area either by physically moving the router or by
lowering the power for the radios (which you may be able to do in the admin
panel for the router).
If neither of these works, as a last ditch attempt you can give your routers
different network names. But this makes it more difficult to keep a connection
when you roam from one router to the other.
Ethernet Over... Coax?
I had not managed to get a fixed connection to the office, which would have
required snaking a Ethernet cable over at least two doorways and three walls.
However, I heard recently about a new technology called MoCA (multimedia
over coax), which makes it possible to send an Ethernet signal over the coax
line from the garage to the office. I bought a MoCA adapter for each end of
the connection - about $160 in total - and wired it up and... it worked like a
charm!
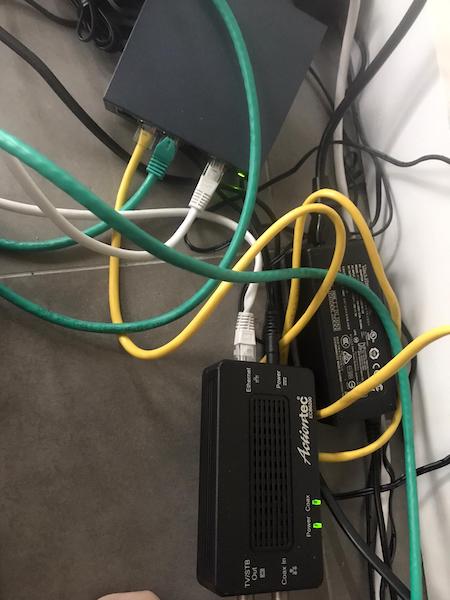
The latency is slightly higher than traditional Ethernet, but only by a few
milliseconds, and the bandwidth is not as high as a normal wired connection but
it's fine - I am still glad to be able to avoid a wireless connection in that
room.
This change let me move my NAS into the office as well, which I'm quite happy
about.
Letting Everything Talk to Each Other
At this point I had a $15 unmanaged switch in the garage that received a
connection from the Sonic Fiber router, and sent it to three places - the
bedroom, the living room and my office. However, the fact that it was unmanaged
meant that each location requested a public IP address and DHCP from Sonic.
Sonic was not happy with this arrangement - there is a limit of 8 devices per
account that are stored in a table mapping a MAC address to an IP address, and
after this you need to call in to have the table cleared out. This design also
meant that the clients on my network couldn't talk to each other - I couldn't
access the NAS unless I was connected to the living room router.
The solution was to upgrade to a "managed" switch in the garage that could give
out DHCP. You can buy one that is essentially a wifi router without the radio
for about $60. This has the same dashboard interface as your
router does and can give out DHCP.
Once this switch was in place, I needed to update the routers to stop giving out
DHCP (or put them in "pass through mode") so only a single device on the network
was assigning IP addresses. I watched the routers and NAS connect, then assigned
static IP's on the local network to each one. It's important to do this before
you set them in pass-through mode so you can still access them and tweak their
settings.
You should be able to find instructions on pass-through mode or "disable DHCP"
for your router online. You may need to change the IP address for the router to
match the static IP you gave out in the previous paragraph.
That's it
I finally have a network that supported everything I want to do with it! I can
never move now.
I hope this post was helpful. I think the most important thing to realize is
that if you haven't done this in a few years, or your only experience is with
consumer grade routers, there are other tools/products you can buy to make your
network better.
If you are interested in this space, or interested in improving your office
network along these lines, I'm working with a company that is making this drop
dead easy to accomplish. Get in touch!
1. I posted on the sonic.net forums to get help several times.
Dane Jasper, the Sonic CEO who's active on the forums, responded to most of my
questions with "you should just use Eero." I love that he is on the forums but
Eero is just not great for what I'm trying to do.
2. I'm simplifying - there are two roundtrips, not one - but the
details are really not that important.
Liked what you read? I am available for hire.

